Few home improvement projects offer the immediate transformation, enhanced curb appeal, and protective benefits of a fresh coat of paint. Whether you are aiming to revitalize a faded living room, refresh a dingy kitchen, or safeguard your home's exterior cladding against water intrusion and UV radiation, a successful painting project requires a systematic approach.
Many homeowners mistakenly believe that painting is simply a matter of purchasing a few cans of color, loading a roller, and applying it to a wall. In reality, a professional-grade finish is the result of 90% preparation and 10% application. Skipping prep steps, miscalculating quantities, or using the wrong sheen in a high-moisture room will lead to premature peeling, cracking, mold growth, or flashing. This comprehensive guide walks you through every stage of the home painting process, providing technical insights, mathematical formulas, and step-by-step checklists to ensure your project stands the test of time.
Paint is only as good as the surface it is bonded to. If the substrate is dirty, wet, powdery, oily, or physically deteriorating, even the most expensive premium paint will fail. Proper surface preparation is the single most important factor determining whether your paint job lasts two years or twelve years.
What this article covers:
- Paint Sheen Chemistry: Selecting the right finish for the job
- Moisture Dynamics: Vapor barriers, hydrostatic pressure, and waterproofing prep
- The Interior Prep Checklist: Patching, sanding, and dust management
- The Exterior Prep Checklist: Power washing, scraping, wood repair, and caulking
- The Physics of Paint Coverage: Understanding standard and porous coverage rates
- Mathematical Sizing: Calculating walls, ceilings, doors, windows, and trim
- Coat Counts & Color Transitions: When two coats are mandatory
- Cost Calculations & Budgeting: Materials, tool rentals, and professional margins
1. Understanding Paint Chemistry and Sheen Selection
To choose the right paint, you must understand what is inside the can. All liquid coatings consist of four main components:
- Pigments: Finely ground solids that provide color, hiding power (opacity), and UV block. Titanium dioxide is the primary white pigment used to create opacity, while organic and inorganic colorants provide the final hue.
- Binders (Resins): Synthetic polymers (such as acrylic, vinyl-acrylic, or polyurethane) that hold the pigment particles together and bind them to the substrate. Acrylic binders are highly flexible and resistant to UV fading, while vinyl-acrylic binders are less expensive and suitable for low-wear interior walls.
- Solvents (Carriers): Liquids that keep the binder and pigment in a fluid state for easy application. Water is the solvent for latex/acrylic paints, while mineral spirits serve as the solvent for oil-based (alkyd) paints. The solvent evaporates as the paint cures, leaving behind a solid film.
- Additives: Specialized chemicals added in small quantities to modify paint performance. Examples include biocides (to prevent mold and mildew), rheology modifiers (to control flow, leveling, and splatter), and defoamers.
The paint's sheen—its level of light reflectivity—is determined by the Pigment Volume Concentration (PVC). The PVC is the volume of pigment relative to the total volume of solids (pigment plus binder) in the dry paint film. A low PVC means there is more binder than pigment, resulting in a smooth, continuous surface that reflects light and resists water penetration. A high PVC means the pigment particles protrude slightly through the binder, creating a textured surface that scatters light and appears flat, but is more porous and difficult to clean.
Choosing the correct sheen is a balance between aesthetic preference (hiding surface defects) and practical requirements (washability and moisture resistance). Here is a detailed breakdown of the five primary sheens:
Flat paint has a high PVC, resulting in a highly non-reflective, velvety surface. It excels at hiding drywall imperfections, uneven framing, and tape joints because it scatters light rather than reflecting it. However, because flat paint is porous, dirt, oils, and grease can easily penetrate the film, making it difficult to wash without burnishing (creating shiny spots from scrubbing). Flat paint is the standard choice for ceilings and low-traffic areas like guest bedrooms.
Named because its soft luster mimics the shell of a chicken egg, this sheen is the industry standard for interior living areas. It contains a higher ratio of binder than flat paint, offering a cleanable surface that resists scuffing while maintaining a low-glare appearance. It hides minor wall bumps and is suitable for family rooms, dining rooms, and adult bedrooms.
Satin paint is a versatile, mid-range sheen that offers a distinct pearl-like luster. It has a higher density of binders, making the cured paint film smooth, durable, and highly wash-resistant. It stands up to regular cleaning and moisture, making it the preferred choice for high-traffic hallways, active kids' bedrooms, foyers, laundry rooms, and kitchens. Because it is reflective, it will highlight deep drywall imperfections, so careful patching and sanding are necessary before application.
Semi-gloss is a highly durable finish with strong light reflectivity. Its dense binder matrix forms a hard, non-porous barrier that repels water, grease, and dirt. It is easy to wipe clean, making it the default choice for baseboards, window casings, door frames, crown moldings, and cabinets. It is also ideal for high-humidity bathrooms.
High gloss paint has a very low PVC, creating a glass-like finish that reflects light intensely. It is the hardest, most durable, and most water-resistant sheen available, but it is also the most challenging to apply. Because of its extreme reflectivity, it will amplify every scratch, dent, or patch mark in the substrate. It is typically reserved for highlight elements, such as front doors, shutters, select architectural trim pieces, or modern high-gloss kitchen cabinets. High gloss requires meticulous sanding between coats to ensure adhesion and a smooth finish.

2. Moisture Dynamics and Waterproofing Prep
Water is the single most common cause of coating failures. When liquid water or water vapor becomes trapped behind a paint film, it exerts physical pressure against the coating. In addition, moisture can break down paint binders chemically, lead to mold and mildew colonization, and cause wood substrates to expand, contract, and rot. Understanding moisture movement is crucial for choosing the right coatings and prep methods.
Every wall assembly has a vapor flow. In cold climates, warm, humid indoor air migrates outward through the wall cavity toward the cold exterior. In warm, humid climates, the opposite occurs. If you seal both sides of a wood wall with a vapor-impermeable paint (such as a heavy oil-based gloss coating), moisture migrating through the wall will hit the back of the paint film and pool. The resulting pressure will lift the paint from the wood, causing blistering and peeling.
Modern acrylic latex paints are formulated to be "breathable" (vapor-permeable). They allow tiny vapor molecules to escape through the microscopic gaps in the cured polymer film while preventing larger liquid water droplets from penetrating inward. When painting exterior wood siding, it is vital to use high-quality 100% acrylic latex paint to maintain this permeability.
Never apply paint to a damp substrate. To check if a surface is dry enough to paint:
- Wood: Use a pin-type moisture meter. Wood moisture content must be below 15% (ideally 12% or lower) before applying primers or paint.
- Concrete/Concrete Masonry Units (CMU): Concrete must cure for a minimum of 28 days to allow moisture and high alkalinity to subside. To test concrete moisture, tape a 2' x 2' sheet of clear plastic tightly to the floor or wall using duct tape. Leave it for 24 hours. If water droplets form on the underside of the plastic, or if the concrete beneath appears dark and damp, moisture is migrating through the slab, and a standard paint will peel.
- Drywall: Drywall moisture should be below 12% before painting.
New concrete, plaster, and stucco are highly alkaline (pH of 12-13). Standard oil-based or acrylic paints applied directly to alkaline surfaces will undergo a chemical reaction called "saponification," which turns the binders into soap, destroying adhesion and causing the paint to blister, liquefy, or flake. Always test pH and use an alkali-resistant primer specifically rated for pH levels up to 13 if the concrete has cured for less than a year.
Bathrooms, laundry rooms, and basements experience high humidity and direct water splash. Standard drywall in these rooms will quickly absorb moisture, causing joint tape to bubble and mold to grow.
- Substrate selection: Replace standard drywall with moisture-resistant drywall (greenboard) or cement board in areas subject to direct water exposure.
- Fungicidal wash: If mold is present, scrub the surface with a solution of 1 part household bleach to 3 parts water, or a commercial fungicide. Let it sit for 10 minutes to kill spores, then rinse with clean water and dry thoroughly. Simply painting over mold will not kill it; the mold will continue to feed on the paper backing of the drywall and digest the paint binder from underneath.
- Primer application: Apply a high-quality acrylic primer containing active mildewcides. For severe moisture areas, shellac or oil-based primers provide a denser barrier that blocks water-soluble stains, but they must be top-coated with a paint that has high water resistance, such as a semi-gloss or specialty kitchen & bath satin paint.
- Elastomeric coatings vs. standard paint: For exterior masonry or basements subjected to wind-driven rain or hydrostatic pressure, standard acrylic paint is too thin to bridge pores and cracks. Use an elastomeric coating. Elastomerics are applied 3 to 4 times thicker than standard paint and maintain high flexibility, allowing them to stretch up to 300% to bridge settling cracks and seal out liquid water while allowing vapor to pass through. Refer to our basement waterproofing cost guide for full structural moisture remediation.
3. The Interior Prep Checklist: Step-by-Step
A flawless interior paint job is achieved through systematic prep work. Follow this sequence:
Remove all furniture from the room. If that is not possible, gather it in the center of the room and cover it with heavy plastic sheeting. Cover floors with heavy canvas drop cloths (plastic drop cloths are slick and do not absorb paint drips, which can easily be tracked onto carpet or hardwood floors). Remove all electrical outlet covers, switch plates, and wall-mounted light fixtures. Tape off baseboards, window trim, and door frames using a premium painter's tape. Press the edges of the tape down firmly with a putty knife or plastic tool to activate the adhesive and prevent paint bleed.
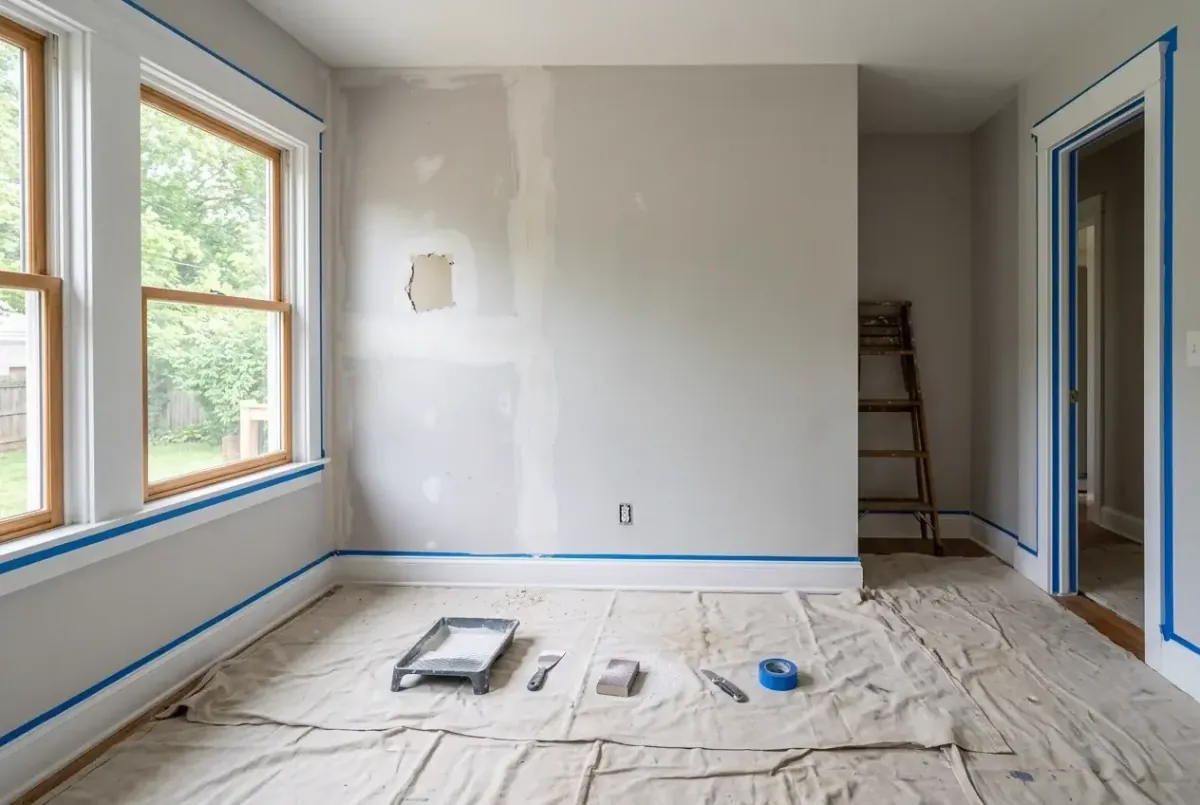
Wipe down walls to remove dust, cobwebs, and grease. In kitchens, walls near stoves often have a layer of grease. Wash these areas with a solution of trisodium phosphate (TSP) and warm water to break down the grease, then rinse with clean water. Paint applied over grease will fail to adhere.
Scrape off any loose, peeling, or bubbling paint using a rigid putty knife or triangular scraper. Lightly sand all walls with 120-grit sandpaper using a pole sander. Sanding creates a profile (a microscopic roughness) that allows the new paint to bond mechanically to the old surface. This is especially important if you are painting over a glossy or semi-gloss finish.
For small nail holes and shallow dents, use a high-quality spackling compound. Press it into the hole, leaving it slightly proud of the surface to account for shrinkage as it dries. For deep dents, large holes, or damaged joints, use a joint compound. Apply fiberglass mesh tape over cracks before skim-coating to prevent future cracking. Let all repairs dry completely.
Once dry, sand all patched spots smooth using 220-grit sandpaper. Run your bare hand over the patch; if you feel even a tiny ridge, it will show through the paint. After sanding, vacuum the walls and trim using a brush attachment, and wipe down the surfaces with a damp tack cloth to remove all fine dust particles.
Fill any gaps between trim (baseboards, crown molding, door casings) and the drywall using a paintable siliconized acrylic latex caulk. Cut the nozzle of the caulk tube at a 45-degree angle to create a small opening, apply a continuous bead, and smooth it with a damp finger or sponge. Let the caulk dry for at least 1 hour before painting.
Apply the correct primer to all patched areas and raw substrates:
- Drywall PVA Primer: Essential for raw drywall and sanded joint compound. It seals the paper and gypsum dust, ensuring the topcoat dries evenly. Without it, the topcoat will soak in unevenly, causing flashing.
- Oil-Based (Alkyd) Primer: Excellent for sealing wood trim, blocking water stains, and covering rust or smoke damage. It blocks water-soluble tannins in pine and cedar trim, preventing brown discoloration from bleeding through the topcoat.
- Shellac-Based Primer: The ultimate stain-blocker. It seals knotty pine knots, crayon marks, ink, soot, and smoke odors. It dries in 15 minutes, allowing you to topcoat quickly.
4. The Exterior Prep Checklist: Step-by-Step
Exterior painting is a battle against the elements. The exterior substrate must withstand thermal expansion, freezing moisture, and direct UV radiation. Meticulous preparation is required.
Washing is the first step of any exterior paint job. It removes dirt, mold, mildew, salt spray, and chalking paint. However, pressure washers can damage siding if used incorrectly.
- Pressure settings (PSI): Use a wide spray pattern (25 to 40-degree tip). Never hold the nozzle closer than 12 inches to the surface.
- Wood Siding/Trim: Keep pressure low, between 500 and 800 PSI, to avoid gouging the wood fibers or raising the grain.
- Stucco: Stucco is porous and can chip easily. Keep pressure between 1,000 and 1,500 PSI, or use a soft-wash method.
- Brick/Concrete: Stronger surfaces can handle 1,500 to 2,000 PSI, but take care to avoid blowing out old mortar.
- Soft Washing: The preferred method for historic wood siding and delicate stucco. This process relies on chemical cleaners rather than high pressure. Apply a solution of bleach, water, and specialized detergent, let it sit to kill mold and dissolve grime, then rinse with a standard garden hose.
- Drying Time: Allow the exterior to dry completely for at least 24 to 48 hours. Wood should be tested with a moisture meter to ensure it is below 15% before painting.
Remove all loose, flaking, or peeling paint using heavy-duty scrapers, pull-scrapers, and wire brushes. Once scraped, sand all bare wood spots with 80-grit to 100-grit sandpaper using a random orbital sander. Sanding removes the weathered gray wood cells and exposes fresh wood fibers for the primer to bond to.
Be sure to feather the edges of the remaining paint. This involves sanding the border where the old paint layer meets the bare wood until the transition is smooth. If you do not feather the edges, the boundary lines will show through the new coat of paint as unsightly ridges.
If your home was built before 1978, the existing paint layers likely contain lead. Dry scraping, sanding, or power washing lead-based paint releases toxic dust and chips that contaminate soil and present severe health risks. You must follow EPA RRP (Renovation, Repair, and Painting) guidelines, which include using plastic ground sheeting to contain all debris, wearing HEPA-rated respirators, and using HEPA-vacuum attached sanders. Never dry-sand lead paint without containment.
Inspect the siding and trim for signs of rot, insect damage, or structural cracks.
- Wood Rot Repair: Dig out all soft, rotted wood fibers. Apply a liquid wood hardener to stabilize the remaining fibers, then fill the void with a two-part epoxy wood filler. Unlike standard wood putty, epoxy filler bonds chemically to wood, does not shrink, and can be sanded, drilled, and painted.
- Siding Replacement: If a piece of wood siding, clapboard, or fascia trim is soft, split, or warped, remove it entirely and replace it with new wood or fiber-cement trim. If you need a full replacement estimate, read our siding replacement cost guide.
Seal all gaps and seams to prevent water intrusion.
- Where to Caulk: Caulk around window casings, door frames, corner boards, soffits, and trim joints.
- Where NOT to Caulk: Do not caulk the horizontal lap seams between clapboard siding planks. These laps must remain open to allow moisture migrating out through the walls to escape. Do not caulk the weep holes at the bottom of vinyl siding or brick walls.
- Caulk Selection: Use a high-quality exterior polyurethane, elastomeric, or siliconized acrylic latex caulk. Polyurethane and elastomeric caulks offer the highest durability and movement capability. Never use pure silicone caulk on surfaces that require paint, as paint will not adhere to silicone and will bubble off immediately.
Apply primer to all bare wood, masonry, patched spots, and chalky surfaces.
- Wood: Use a high-quality exterior wood primer. For cedar or redwood, use an oil-based or specialty water-based acrylic primer that blocks tannins. Tannins are water-soluble acids that migrate to the surface when wet, creating yellow-brown stains on light paint.
- Masonry/Stucco: Use an alkali-resistant masonry primer. This seals the porous surface, blocks efflorescence (mineral salts carried to the surface by moisture), and protects the topcoat from high pH levels.
- Chalky Surfaces: If the old paint has oxidized into a powdery chalk residue, wash it thoroughly. If chalk remains, apply a penetrating masonry or alkyd primer that can bind the chalky particles to the sound substrate.
5. Sizing & Math: Coverage and Quantity Estimations
To prevent material waste or the need for mid-project paint store runs, you must calculate the paintable surface area of your project. This requires understanding standard paint coverage rates and applying basic geometric formulas.
A standard gallon of paint contains approximately 1,604 dry mil-square feet of solid material (1 mil = 1/1,000 of an inch). When applied to a perfectly smooth, non-porous surface, a standard gallon will yield a dry film thickness of 1.5 to 2.0 mils over an area of 350 to 400 square feet.
However, in practice, coverage is often lower due to surface texture and porosity:
- Surface Porosity: Raw substrates (such as unprimed drywall, fresh plaster, concrete masonry units, or rough wood) absorb the liquid paint vehicle like a sponge, drawing the binders and pigments deep into the pores. This reduces the effective coverage of the first coat to 200 to 250 square feet per gallon. Proper priming seals these pores, allowing the subsequent color coats to achieve their standard 350-400 sq. ft. coverage.
- Surface Texture: Textured drywall (knockdown, orange peel, popcorn), rough-sawn wood siding, stucco, and brick have a much higher surface area than a flat plane. A heavily textured wall can increase surface area by 20% to 50%, reducing coverage to 250 to 300 square feet per gallon because the paint must cover the peaks, valleys, and side profiles of the texture.
- Application Method: Spray application often uses 10% to 30% more paint than brush-and-roller application due to overspray, wind drift, and high paint volume delivery.
Use this table as a reference for estimating single-coat coverage per gallon:
To find out how many gallons of paint you need, use the following formulas. For complex room geometries, you can use our area calculator to find the total square footage of walls, ceilings, and gables before applying the paint calculator formulas.
Primary Calculation Formulas:
1. Wall Area = Room Perimeter × Ceiling Height
2. Room Perimeter = (Length + Width) × 2
3. Ceiling Area = Length × Width
4. Paintable Wall Area = Wall Area − Opening Deductions
5. Gallons Needed = (Paintable Wall Area / Coverage Rate) × Number of Coats
Standard Deductions for Openings:
- Standard Door: Deduct 21 square feet per door (typical size is 3' x 7').
- Standard Window: Deduct 15 square feet per window (typical size is 3' x 5').
- Baseboards: (Room Perimeter minus door widths) multiplied by height (typically 0.3 to 0.5 feet).
Let us calculate the paint, ceiling paint, and trim paint requirements for a master bedroom with the following dimensions:
- Room Length: 20 feet
- Room Width: 15 feet
- Ceiling Height: 9 feet (flat ceiling)
- Openings: 1 double entry door (6' x 7'), 1 bathroom door (2.5' x 7'), and 3 large windows (3' x 6')
- Trim: Baseboard trim is 5 inches (0.42 feet) high; crown molding is 6 inches (0.5 feet) high.
- Substrate: Walls are smooth, previously painted drywall in good condition (using standard 400 sq. ft./gal coverage).
- Number of Coats: 2 coats for walls, 2 coats for ceiling, 2 coats for trim.
Step 1: Calculate Wall Area
First, find the perimeter of the room:
Perimeter = (20 + 15) × 2 = 70 linear feet
Multiply the perimeter by the ceiling height to get the gross wall area:
Gross Wall Area = 70 × 9 = 630 square feet
Step 2: Calculate Deductions
Now, calculate the area of doors and windows to subtract:
- Double Entry Door: 6 feet × 7 feet = 42 square feet
- Bathroom Door: 2.5 feet × 7 feet = 17.5 square feet
- Three Windows: 3 × (3 feet × 6 feet) = 3 × 18 = 54 square feet
- Total Deductions: 42 + 17.5 + 54 = 113.5 square feet
Step 3: Calculate Paintable Wall Area
Subtract the deductions from the gross wall area:
Paintable Wall Area = 630 − 113.5 = 516.5 square feet
Step 4: Calculate Wall Paint Quantity
We will use a standard coverage rate of 400 sq. ft. per gallon for a smooth wall, and we plan to apply two coats:
Total Wall Paint Area = 516.5 × 2 = 1,033 square feet
Gallons Needed = 1,033 / 400 = 2.58 gallons
Because paint is typically sold in full gallons (or quarts), you must round up to the nearest whole gallon. You will need 3 gallons of wall paint.
Step 5: Calculate Ceiling Paint Quantity
Ceilings are flat and do not contain window or door deductions:
Ceiling Area = 20 × 15 = 300 square feet
Total Ceiling Paint Area (2 coats) = 300 × 2 = 600 square feet
Gallons Needed = 600 / 400 = 1.50 gallons
You will need 2 gallons of ceiling paint (or 1 gallon and 2 quarts, though buying two gallons is usually more cost-effective).
Step 6: Calculate Trim and Baseboard Paint Quantity
Trim paint is calculated by linear footage multiplied by trim height:
- Baseboards: Linear footage is the perimeter of the room minus the door widths.
- Door widths to subtract: 6 feet (entry) + 2.5 feet (bathroom) = 8.5 feet
- Baseboard linear feet = 70 − 8.5 = 61.5 feet
- Baseboard Area = 61.5 feet × 0.42 feet (5 inches) = 25.8 square feet
- Crown Molding: Continuous around the ceiling perimeter.
- Crown Molding Area = 70 feet × 0.5 feet (6 inches) = 35 square feet
- Door & Window Casings: The trim frames around the doors and windows.
- For the entry door (6'x7'): (7' + 7' + 6') = 20 linear feet. With 4-inch trim (0.33'): 20 × 0.33 = 6.6 sq. ft.
- For the bathroom door (2.5'x7'): (7' + 7' + 2.5') = 16.5 linear feet × 0.33 = 5.4 sq. ft.
- For the three windows (3'x6'): 3 × (6' + 6' + 3' + 3') = 3 × 18 = 54 linear feet × 0.33 = 17.8 sq. ft.
- Total Trim Area: 25.8 + 35 + 6.6 + 5.4 + 17.8 = 90.6 square feet
- Total Trim Paint Area (2 coats): 90.6 × 2 = 181.2 square feet
- Gallons Needed: 181.2 / 400 = 0.45 gallons
Since 0.45 gallons is slightly less than two quarts, you should purchase 2 quarts (or 1 half-gallon, if available) of semi-gloss trim paint.
To make these calculations instantly for any room size or house dimensions, use our free paint calculator. It allows you to enter specific dimensions, adjust for textures, and select the number of coats.
Calculate Your Paint in Seconds
Avoid running out of paint or buying too much. Enter your dimensions, doors, and windows to get an instant gallon estimate for walls, trim, and ceilings.
6. Number of Coats: When is 1 Coat Enough vs. 2 (or 3)?
A common question among homeowners is whether they can get away with applying a single coat of paint. While paint manufacturers often market "one-coat coverage" paints, this is rarely sufficient in real-world scenarios.
When paint is applied to a substrate, the binders seek out the pores of the material. The first coat penetrates and seals these pores, forming a mechanical grip. As the solvent evaporates, the film shrinks slightly, following the microscopic contour of the wall. Because of this penetration and shrinkage, the first coat is rarely uniform in thickness, sheen, or color opacity.
The second coat does not sink into the substrate because the pores are already sealed. Instead, it builds a uniform dry film thickness (DFT). This creates a solid layer of pigment that hides the underlying color completely and ensures that the binder matrix is thick enough to resist moisture, scrub wear, and physical impact. The second coat is what yields the true sheen of the paint; without it, the finish will appear splotchy or flat.
You can apply a single coat only if all of the following conditions are met:
- You are painting over an existing painted surface that is in excellent condition (no peeling, cracks, or patches).
- The new paint is the exact same color (or a very close match) as the old paint.
- The new paint has the exact same sheen as the old paint.
- The paint is a premium, high-solids product designed for single-coat refreshes.
You must apply two coats of paint in the following situations:
- Substrate repairs: If you patched nail holes, cracks, or drywall tape joints, those patches are porous and will cause flashing if you apply only one coat.
- Color changes: Transitioning from a dark color to a light color (or light to dark) requires at least two coats to hide the old color.
- Sheen transitions: Moving from a flat paint to a semi-gloss or satin paint requires two coats to achieve the correct level of light reflectivity.
- Exterior surfaces: Exterior paint must withstand severe weather. A single coat is too thin and will break down under UV light and rain in half the time of a two-coat system.
In some cases, three coats (or a primer and two topcoats) are required:
- Highly porous masonry: Concrete block and stucco are so absorbent that they require a heavy coat of primer (block filler) followed by two full coats of paint.
- Knotty wood and bleeding stains: If you are painting wood with heavy resin knots (like pine) or water stains, you must apply one spot-coat of stain-blocking primer, one full coat of primer, and two topcoats.
- Deep/Saturated color transitions: Bright red, deep yellow, and saturated blues have thin pigments that lack hiding power. They often require a grey-tinted primer followed by two or three coats of color to achieve a uniform finish.
7. Cost Calculations and Budgeting
Understanding the financial scope of your project is key to planning. The cost of a painting project varies depending on whether you choose to do the work yourself (DIY) or hire a professional contractor.
A DIY project saves labor costs but requires buying all paint, primers, and application tools. Below is a breakdown of estimated DIY costs:
- Paint Cost: Quality paints run between $45 and $75 per gallon. For a typical 2,000 square foot home interior, you will need approximately 15 gallons of wall paint, 3 gallons of ceiling paint, and 4 gallons of trim paint. Total paint cost: $1,000 to $1,800.
- Primer Cost: PVA primers cost $25 to $40 per gallon, while specialty oil-based primers cost $45 to $60 per gallon. Budget for 5 gallons: $150 to $250.
- Sanding and Patching Supplies: Joint compound, spackle, mesh tape, sandpapers, and tack cloths will run $50 to $100.
- Masking Tape: Premium painter's tape costs $7 to $12 per roll. You will need 4 to 8 rolls: $40 to $80.
- Application Tools: Quality brushes (angled sash brushes) cost $15 to $25 each. Roller frames, covers, paint trays, extension poles, and drop cloths will total $150 to $300.
- Equipment Rental: If you are painting a two-story exterior, renting scaffolding or a power washer will add $200 to $600.
Total DIY cost for a whole-house repaint ranges from $1,500 to $3,000 depending on the tools you already own and the brand of paint you choose.
If you hire a professional contractor, labor will account for roughly 75% to 85% of the total bid. Painters do not charge by the hour; they charge by the square foot of paintable surface area or use a standardized room rate.
- Interior Rates: Professional painters typically charge $2.00 to $4.50 per square foot of wall area. For a typical 12' x 12' bedroom, expect a quote of $400 to $900 for walls only, or $800 to $1,500 if it includes ceilings, closets, doors, and trim.
- Exterior Rates: Exterior professional painting ranges from $2,500 to $6,500 for a standard home, with costs rising significantly for multi-story properties, complex trim detailing, or stucco/brick substrates. For a complete breakdown, refer to our exterior house painting cost guide. For general interior room calculations, see how much paint you need per room.
Investing in premium 100% acrylic paints costing $70/gallon instead of budget contractor-grade paints at $35/gallon can reduce your long-term maintenance costs by 30%. Premium paints contain a higher volume of solids, which makes the cured paint film thicker, more UV-resistant, and easier to clean. It lasts up to 10-12 years before requiring a repaint, compared to just 5-6 years for economy paint, saving you thousands of dollars in labor over the life of your home.
Summary Checklist: The Road to a Flawless Paint Job
To achieve a professional-grade finish, ensure you check off these essential steps:
- Measure accurately: Find your exact wall areas and subtract doors and windows to determine your paint volume. Use our area calculator to verify your math.
- Select sheens by usage: Flat for ceilings, eggshell for living walls, satin for hallways and kitchens, and semi-gloss for trim and bathrooms.
- Check moisture levels: Ensure concrete has cured for 28 days, wood is under 15% moisture, and mold is treated before applying primer.
- Wash all exterior surfaces: Use low pressure or soft-washing to remove dirt and chalking paint.
- Apply the correct primer: PVA for drywall, oil-based for wood trim/stains, and alkali-resistant primer for stucco and masonry.
- Budget for two coats: Two coats are necessary to achieve the true color, thickness, and durability of the coating.
By taking the time to complete the preparation phase, select quality materials, and calculate the right quantities using our paint calculator, you will save time and money, and enjoy a beautiful finish that protects your home for years to come.